Creative Chemistry 103 Participant

Creative Chemistry 103 Participant
Creative Chemistry 103, 102, 101 Participant

Sunday, June 12, 2016

CC101Wk2Day10

 Summer of Creative Chemistry 101, Week 2, Day 10: Distress Stickles

I dampened a tag and covered it with Peeled Paint Distress Stain.  I dried the tag, then stamped the tree stamp with archival black ink.  I dried that, and then applied a thin coat of Distress Stickles.  The camera doesn't show how charming the result is.

I get to put a CC101 Graduate icon on my blog now.  Woo-hoo.

Location:  Bentonville, AR, USA

Permalink:  http://barbrad42.blogspot.com/2016/06/cc101wk2day10.html

CC101Wk2Day9_3

 Summer of Creative Chemistry, Week 2, Day 9, Technique 3

I applied the following Distress Inks directly to my craft mat:  Mustard Seed, Picked Raspberry, Mermaid Lagoon, Walnut Stain, Spiced Marmalade, and Mowed Lawn.  I then deposited little clumps of Perfect Pearls on the stains.  Then, I spritzed the inks and powder, after which I dragged my tag through the liquid.  Somewhere along the line, Mermaid Lagoon got lost, but this is the result.  Strangely, the top twinkles more than the bottom.

Location:  Bentonville, AR, USA

Permalink: http://barbrad42.blogspot.com/2016/06/cc101wk2day93.html

CC101Wk2Day9_2

 Summer of Creative Chemistry 101, Week 2, Day 9, Technique 2:  Perfect Distress.

I wet the tag and covered it with Spun Sugar Distress Ink.  I heat set the tag and stamped it with a Tim Holtz stamp using Picked Raspberry, Mermaid Lagoon, Mowed Lawn, and Walnut Stain Distress Inks in mini ink pads.  I dusted the image with Perfect Pearls (Perfect Pearl) using a fine-tip paint brush, and then dusted away the excess with a large brush.  I then spritzed the tag which caused the ink under the Perfect Pearls to wick.  I heat set the tag and took a photo.

Location:  Bentonville, AR, USA

Permalink:  http://barbrad42.blogspot.com/2016/06/cc101wk2day92.html

CC101Wk2Day9_1

 Summer of Creative Chemistry 101, Week 2, Day 9, Technique 1: Perfect Distress Mist


I wet the tag and then applied Broken China, Festive Berries, and Peeled Paint stain dabbers to my tag, after which I sprayed it with Perfect Pearls Mist.  I know I didn't follow directions, but I have had mica powders clog my mini-misters before.  I just did not want that to happen again.

Location:  Bentonville, AR, USA

Permalink: http://barbrad42.blogspot.com/2016/06/cc101wk2day91.html

Saturday, June 11, 2016

CC101Wk2Day8_3

 Summer of Creative Chemistry, Week 2, Day 8, Technique 3: Shattered Stains.

I found an oval I had die cut during a previous project and used that for my Technique 3: Shattered Stains.  I put a very thick coat of Rock Candy Crackle Paint on the oval and let it dry over night.  In the morning it was nicely crackled so I added various Distress stains to create this gloriously colored object.

Location:  Bentonville, AR in beautiful Northwest Arkansas

Permalink:  http://barbrad42.blogspot.com/2016/06/cc101wk2day83.html

CC101Wk2Day8_1

 Summer of Creative Chemistry, Week 2, Day 8, Tech 1

I used Distress Glacier White Paint Dabber on a wooden stamp of the Cross on which lillies are hanging.  I let the stamp impression air dry while I worked on the remainder of the Day 8 activities.  Then, I used various colors of Distress Stain Dabbers to color the tag.  The white paint acted as a resist.

Permalink:  http://barbrad42.blogspot.com/2016/06/cc101wk2day81.html


CC101Wk2Day8_2

 Summer of Creative Chemistry, Week 2, Day 8, Technique 2, Use Crackle Paint


The "House Built on Sand" is crumbling in the storm due to 1) well-documented bad architecture, 2) rising sea levels, and 3) Distress Rock Candy crackle paint aided and abetted by Distress inks and markers, and Micron pens.  Notice the crackled monster rising with the storm surge.  I think I read and watch too much science fiction.

Permalink: http://barbrad42.blogspot.com/2016/06/cc101wk2day82.html 

Friday, June 10, 2016

CC101, Wk2, Day 7

Technique #1, Nostalgic Batik, in Day 7 of CC 101.

In this technique, I stamped the images of mortar board graduation caps on a tag made from watercolor paper.  I stamped the top image in Mustard Seed and the bottom in Abandoned Coral.  While both inks were still wet, I melted clear embossing powder on each of them.  Then, I inked the tag with various shades of brown Distress Inks and then wiped off the excess.  The embossing powder resisted the inks for the most part.  Then, I used Black Soot to stamp text as a background.  I wiped the ink of the text off mortar board caps.  In this instance, the whole "resist" thing did not work as well as I thought it would.


 Technique #2, Rusted Enamel, in Day 7 of CC 101.

In this technique, I covered a tag with multiple colors of Distress Inks but the Mustard Seed dominated.  I then covered the tag with embossing powder, flicked it, drew some patters in the powder, and then melted it.  Once it cooled and dried, I covered the surface of the tag with Walnut Stain and wiped it off.  The embossing powder resisted the ink, but Walnut Stain remained in the holes left by flicking and the patterns.


Tuesday, June 7, 2016

CC101 Wk2 Day6

Week 2 Day 6 techniques for Tim Holtz Summer of Creative Chemistry 101.

Location:  Bentonville, AR, USA

Permalink:  http://barbrad42.blogspot.com/2016/06/cc101-wk2-day6.html 


 Technique 1a
Watercolored with Spun Sugar and Picked Raspberry Markers on Dry Watercolor Paper 


 Technique 1b
Watercolored with Spun Sugar and Picked Raspberry Markers on Wet Watercolor Paper


Title:  Blending with Markers Technique

 Technique 2a
Blended Pigment from Spun Sugar and Picked Raspberry Markers Directly on Watercolor Paper
 This was interesting.  I covered all the flowers with Spun Sugar.  Then, I colored the edges of the flowers with Picked Raspberry.  Finally, I used the Spun Sugar marker to blend the two colors.

 Technique 2b
Blend Markers on Craft Sheet
Following instructions, I layed down some Picked Raspberry marker ink on my craft paper.  Then, I dipped the brush tip of my Spun Sugar marker in the Picked Raspberry ink "puddle".  Once the two colors had blended on the Spun Sugar marker tip, I applied the Spun Sugar marker to my tag.


 Technique 3

I colored directly to the rubber stamp.  I colored the main body of the peacock with Chipped Sapphire marker and the tail with Peacock Feathers marker.  I colored the beak and legs with Gathered Twigs marker.  I blended the edges of the Chipped Sapphire and Peacock Feathers.  I stamped a piece of lightly glazed cardboard and let the watercolor peacock dry for several hours.  I then glazed then entire tag with Vintage Photo ink which proved to be not dard enough, so I recolored withWalnut Stain and then used the spritz and flick technique.  Analysis:  Chipped Sapphire and Peacock Feathers colors are so close to being the same color, I should never have used them right next to each other.  After I glazed the entire tag, I could no longer tell the difference between the two colors even though I vigorously buffed the tag.


CC101, Wk1, Day5c

  Title: Marbled Stains Technique

I used bright Distress stains with white Distress paint in the middle of the stains and created this luscious, milky background.  I then used archival ink to visualize the stamps.  I used white Distress paint because I did not have any liquid Picket Fence.

Location:  Bentonville, Arkansas, USA

Permalink:  http://barbrad42.blogspot.com/2016/06/cc101-wk1-day5c.html 


CC101, Wk1, Day5B

 Title:  Stamping with Stains Technique 

I used Distress stains to lay down bright colors on a wet tag.  I then cheated because I did not have Picket Fence stain.  Instead, I used white pigment ink on a musical notes stamp to lay down a foundation for white embossing powder.  I dried the embossing powder which gave me a lovely, lilting music staff across the tag.  Then, I used purple archival ink to stamp a peacock.

Permalink:  http://barbrad42.blogspot.com/2016/06/cc101-wk1-day5b.html


Monday, June 6, 2016

THCC101, Wk 1, Day 5A

 Title:  Kraft Resist

I created two submissions for Technique A today.  I did not have Kraft Resist paper, so I made my own by using Liquitex Varnish.  The left example of this technique is a map; I painted the roads with Liquitex Varnish which, when it had dried, made the roads resist water-based inks.  On the right, I painted the flowers with Liquitex Varnish and then covered over the page with Distress inks.  The flowers shown through because they had been painted with varnish.

Location:  Bentonville, AR, USA

Permalink: http://barbrad42.blogspot.com/2016/06/thcc101-wk-1-day-5a.html 


Sunday, June 5, 2016

THCC101_Wk1_Day4


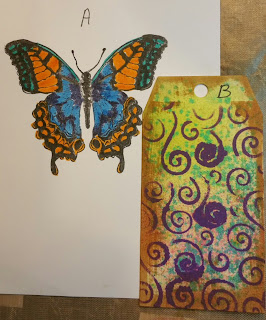
Here are my submissions for Day 4 of the Summer 2016 Creative Chemistry 101:  
A) A stamp colored Ranger reinkers, and B) layered misting technique in which I used reinkers as sprays, laid down a layer of ink sprays, and then sprayed a stencil.

Location:  Incredibly beautiful Northwest Arkansas USA.

Permalink: http://barbrad42.blogspot.com/2016/06/thcc101wk1day4.html 


Friday, June 3, 2016

Summer2016 CC101 Wk1 Day3C

 Title: Stamping with Reflections Technique.

This is the last assignment for Day 3.  While the instructions called for using a Tim Holtz Texture Fade, I had to use something almost as good:  An embossing folder with a decorative pattern in concert with a Tim Holtz accessory that creates unembossed areas within the overall embossed tag.  I used a white-core piece of pink cardstock and stamped it with butterflies.  The shading around the perimeter comes from Ranger Distress Inks.

http://barbrad42.blogspot.com/2016/06/is-last-assignment-for-day-3.html


Summer2016CC101Wk1Day3B

   Title: Archival Resist Technique

Here is my Creative Chemistry 101, Week 1, Day 3B submission to the terrific art class I am taking at OnlineCardClasses.com .  Unfortunately, I cannot upload this link or submission 3A because the link is down.  Also, the CC101 Graduate icon has returned with no sight of the CC101 Participant icon (thank goodness I saved this to my computer).

Oh, well.  I can wait.  The goal of this exercise was to stamp with archival ink on a card and then completely cover the card with water-based ink like Distress ink.  After buffing the card, the archival ink images are revealed because they are oil-based and, therefore, resist the water-based ink.  Cool.

Onward to exercise 3C.  This one is beautiful, and I can wait to do it.

Barbara Rademacher
Location
Permalink: http://barbrad42.blogspot.com/2016/06/is-my-creative-chemistry-101-week-1-day.html


UPDATE:  The OCC network appears to be going through a fail.  Weekly videos cannot be downloaded either, and the ability to do that is part of the class.  SOOOOO, I bet the OCC person at the other end of my email won't know I emailed her/him.

Oh, well.

Wednesday, June 1, 2016

Summer CC101 2016 Wk1 Day3A

 Title: Alcohol Ink Agates Technique

It's Day 3 in this Summer art extravaganza, Tim Hotlz's Creative Chemistry 101.  The first homework assignment was to create a composition utilizing alcohol inks on glossy paper, and then top it off with a stamp - I used two.

Because I had no alcohol inks, I purchased an alcohol ink kit from Hobby Lobby.  It had everything I needed in one box, including stamps.  The tree stamp at the page bottom is one of them.

I am located in one of the most beautiful places on earth, the Ozark Mountains of Northwest Arkansas, USA.

The permalink to this site is http://barbrad42.blogspot.com/2016/06/summer-cc101-2016-wk1-day3a.html  .  


Creative Chemistry 101, Week 1, Day 2

Title:

A. Blended Distress/Spritz & Flick Technique
B. Brushless Watercolor Technique
C. Wrinkle-Free Distress Technique

I used Distress Inks to compose the three tags pictured here.

Permalink: http://barbrad42.blogspot.com/2016/06/creative-chemistry-101-week-1-day-2.html

Location: Rogers, Arkansas, USA